This tutorial will cover a FREE and EASY method to add audio files into a Google Doc. This tip allows teachers to read the questions for their test in advance, and embed the audio files into the document.
WHY??
Students who struggle to read will be able to complete their work without having another person present to read aloud to them, will be able to work at their own pace, and can return to questions as needed.
HOW?? 1) Install the Google Drive app to your smartphone. Log in to your CESD account. 2) Create a folder in your Drive called Audio Files 3) Create a subfolder in this new folder and give it the name of the test you will be reading. 4) Move the test into the folder (failing to do this step will break the audio links when you move the test folder into the Team Drive for Myles to create testing accounts for!) 4) Using the audio recording application on your phone, read each set of instructions or questions aloud SEPARATELY. You will have a bunch of audio files once you’ve read each instruction, source and question aloud separately. (On an iOS device, the audio recording app is called “Voice Memos” and it comes factory-installed.) 5) Upload your audio files to the folder you created in step 3. 6) Find an icon online to represent audio to your students. 7) Insert the icon after each set of instructions, source excerpt or question. (Once you have it at a size you like, COPY-PASTE it!) 8) Open Google Drive in another tab and browse to the folder you uploaded your audio files to. 9) Right click on the desired audio file. 10) Choose “Get Sharable Link” – Google will copy the link automatically for you. 11) Right click on the icon and choose “LINK” 12) Paste the link
Repeat, repeat, repeat – but remember – once this is done, you never have to do it again!!!
BUT MY FORMATTING!! You can make adjustments to the icon by choosing INSERT->DRAWING and shrinking the icon you selected in step 6 above in the drawing screen to better fit your allotted space.
If you’re looking for some extra knowledge for managing your Google Calendar (or Google Calendars as the case may be), here’s a little tutorial Michelle did for the Division Office staff.
There are a few things you can do to assist with organizing your Teacher Resources in Google Drive. You don’t need to do all of them, but to construct your individual workflow, considering the following may be helpful.
Create a folder and call it “Archive” – put resources you are not presently using, but may need in the future into this folder. I openly acknowledge that I am a bit of a digital hoarder when it comes to teaching resources. Teaching assignments can change from year to year, as we all know, and so deleting content can be a challenge, but we also want to not have digital clutter. If we are moving, it’s a great opportunity to purge and organize.
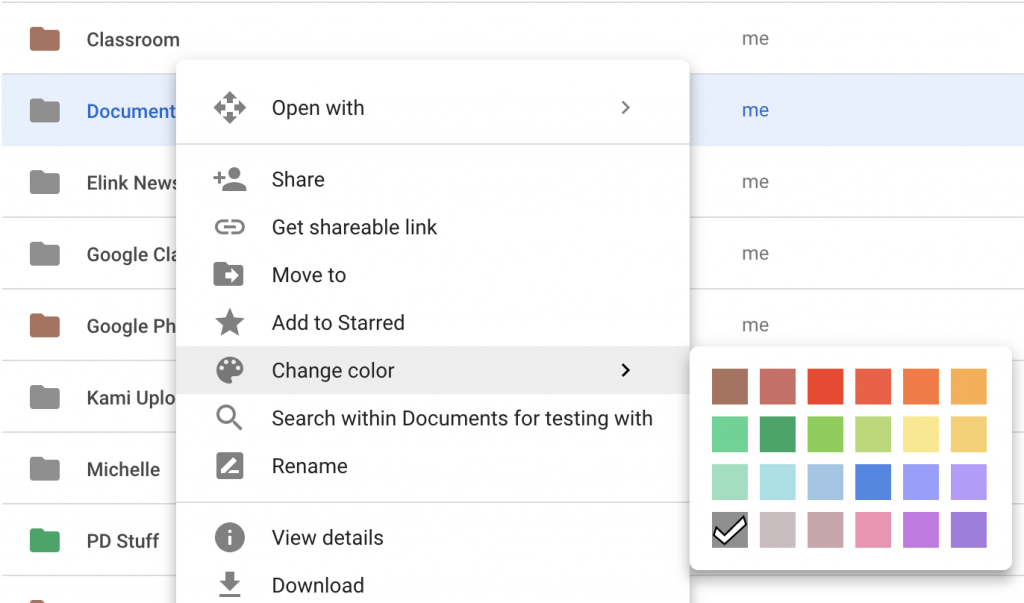
You can set colours on the folders in your Google Drive. If coloured folders will give you a visual to aid in organizing and retrieving, by all means…. right click on the folder and select a colour!
3. You can also mark folders or documents with a star (right above the “change color” option) and henceforth when you use the “search” feature of Drive, the starred items will be boosted to the top of the search results. Additionally, on the left-located menu, beneath “My Drive” and “Team Drive” is a label “Starred” – if you click that, it will shortlist all documents you’ve applied a star to!
Real life has an interesting way of presenting opportunities that can be embedded into instruction.
This fall, I’ve done a wholesale change to my grade eight technology program. I’ve launched a course with design learning at the heart of the project. The upfront costs were significant, but not impossible for a junior high school if we proceed strategically. To date I’ve invested in a Cameo cutter (and much vinyl for the cutter), a 3-D printer, some raspberry Pi kits, a Makey Makey, Bloxels, and Ozobots coding robots.
The Cameo cutter has allowed us to begin to advertise our skills, and attempt to take some measures to recoup the cost of the consumables necessary to run an effective design program. To that end, we’ve created a Facebook page called 110 Design (My classroom is room 110, so should someone else take over the program, the advertising is easy to continue forward).
In the past month, our town has launched a new system for collecting garbage, and it involves standardized “black garbage bins” that all citizens must use. There has been a huge backlash from the residents in this town, and we struggled to make sense of the negativity. As we inspected the conversations on the local Facebook groups; it occurred to us that perhaps the underlying concern was in the potential to lose one’s garbage bin should a wind kick up. It’s a fact that our area of the province can be quite windy at times; particularly in the spring.
To take a small litmus test as to whether we were on the right track with this thought, I posted an offer on the local Facebook groups to provide small, standardized vinyl labels to be affixed to the top of the bins, for the cost of $5.00, providing the address of the residence the bin belongs to. The response was overwhelmingly positive; and requests started to flood in.
The first challenge to students was to find a means of tracking the orders. Students were presented with the challenge via Google classroom and were given the opportunity to work alone, in pairs or with a group of three.
We settled on using Google Forms, as we are a GSuite school and there is no cost to us (or to our profit margin) to utilize it to collect the information. Next we sent an email to our Mayor asking if we could present our idea to Town Council at their first available opportunity. Within an hour of sending the email, we received this response:
It reads:
Good morning Michelle. Thanks very much for your email concerning your school’s idea to help with labelling the black carts! It sounds very promising, and I’ve forwarded your request to come before council, to our Director of Legislative Services. Someone should be getting in contact with you soon. It seems like a very solid idea, and could help a great deal with people being able to recognize their own carts. Please pass along my compliments to your student group for their citizenship and forward thinking! Thanks again, Pat.
Students are so proud to be part of the solution to a local issue, and are incredibly eager to have the opportunity to present our plans to town council, and then we will begin the process of creating and delivering. They will certainly have a challenge in monitoring which addresses are complete, and planning how we are going to collect the $5 per label from the citizens without putting pressure onto our school’s secretaries. With only having mentioned it once on the local Facebook page and once on our school’s Facebook page, we already have over 100 orders for these bin labels.