Help Teaching

Help Teaching is a website where teachers can create printables for their classroom. The free version will allow you to make a test or quiz of up to 10 questions. There is content for all subjects and all grades on this site.
Help Teaching is a website where teachers can create printables for their classroom. The free version will allow you to make a test or quiz of up to 10 questions. There is content for all subjects and all grades on this site.
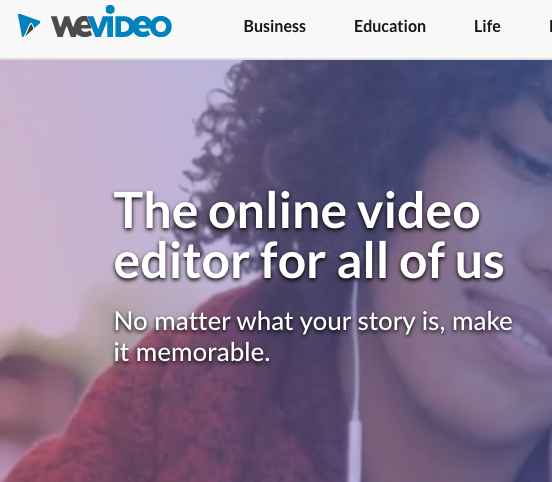
We Video is a free online video editor. To access it for free, there are a couple of limitations. The application will limit videos to 5:00 in length, which generally speaking is more than enough for any class project. If needed, a student could separate their video into parts and submit it in segments for grading.
The free We Video also limits users to 1GB of storage.
Finally, We Video will put a watermark on videos that were created using their free utility, but the brain tunes that out quickly.

This edition of Ed Tech Tips, Tricks & Hacks contains nuggets of wisdom on:
Inking – writing on top of an image, otherwise known as annotating is possible using a Chromebook. Our amazing Lan-Tech, Bailey has put together this “How-to” slideshow to assist teachers who want to use it, or who have used it in the past but now can’t find it.
This is a pretty handy skill to have for teaching in GSuite.
The wonder of cloud software is that when they update the application, all users benefit immediately.
All teachers and students in CESD are provided with a full license to Kami. If you do not see the purple circle with the letter K in the upper portion of your screen, click here to install it!
Kami is a fantastic annotation tool for teachers to use during instruction. It is, additionally a wonderful piece of assistive technology for students who struggle with various disabilities that negatively impact their output and ability to show their comprehension of the content being taught.
Documents in .pdf form are ideal for Kami. If you wish for Kami to be able to read the content to your students (it does, indeed, have this capacity), your .pdf will have to be scanned using OCR (Optical Character Recognition) as that is what turns the digital version into actual letters as opposed to the “dots” of a photocopy-type scan. There are heaps of applications for smartphones that offer OCR. Snapverter is one of these applications. Made by the same company that makes Read & Write, Snapverter can be installed on your phone and in a matter of seconds you can have an OCR-scanned document for your students who struggle. It’s literally that easy.
The Kami toolbar has seen some changes this fall. These changes are in response to user feedback, so don’t ever make the mistake of thinking giving ed tech companies is a waste of time; it absolutely is not! You presently have the choice between the new or the old toolbar, so if you want to test out the new toolbar (if you’re new to Kami, you should just go right to the new toolbar so you aren’t learning the old one only to have to do a second run at learning when they discontinue the old one!) We will tackle how to enable the new toolbar in a moment. First let’s look at WHAT Kami even offers.
At the heart of Kami is the ability to close read and move through files. To do this we have:
To annotate, highlight or otherwise edit your file you can use our selection of markup tools:
To add some color and fun to your file you can try:
Lastly, you can insert a range of media into your Kami file:
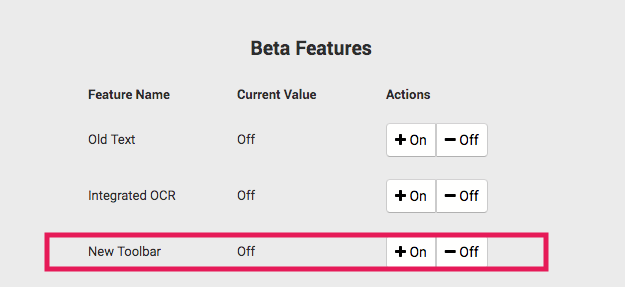
If you need to go back to the old toolbar you can turn it back off there, but please let the folks at Kami know why you went back to the old one (do so by emailing their support as eventually they will fully migrate to the new layout. Email address is support@kamiapp.com.)
Much of the content posted here comes directly from Kami’s own blog – it’s super awesome, and you should check it out ASAP!

This edition of Ed Tech Tips, Tricks & Hacks contains nuggets of wisdom on:

This edition of Ed Tech Tips, Tricks & Hacks contains nuggets of wisdom on:
These may not be the official terms for the software, but I’m going to choose to use these terms to try to help with the distinction between “cloud” software and installed software. To ensure our definitions are aligned, when I refer to static software I am speaking of software that you purchase and install to your hard drive (back in the day, on a disc or CD). By dynamic software I am speaking of applications we use that are updated automatically without incurring additional costs.
The technological revolution has occurred at an alarming rate. As a society, we’ve not had the internet in our homes for even 25 years yet. And if you recall that first internet we all had (it used your telephone cord – back when telephones plugged into the wall) and it made “that noise” when it connected you to the internet.
Once you were connected, you had to wait… for practically everything to download. Remember how images looked as they gradually loaded onto your screen? The internet, as it were, could barely handle one-way traffic – it sent data to you. Few websites offered any interactivity whatsoever. The Internet was still a baby.
Then along came cable internet! We could bring in the guys from Shaw to hook this modem thing into our cable jack and it would allow data to travel through those wires. And it was WAY faster. It was also the era of
Napster where people were beginning to use the web interactively. To share music illegally. (You’ve gotta love humans). Regardless of the ethics of sharing music, the capacity of the internet to handle traffic was improving! It’s around this time that Web 2.0 began to be a thing. And all “web 2.0” means is the internet with two way traffic. News stories that anyone and everyone can count on. YouTube videos that provoke discussions. Social Media. The Internet became a place where we could participate. We could collaborate. It ushered in a new era of computer usage. (For those who are curious, web 3.0 is where the internet will begin to move into 3D cyberworld.)
GSuite is a prime example of the evolution of web 2.0 – the dynamic web – making its way into productivity software. With GSuite we are never “three versions behind” in our software. It updates automatically as Google rolls out updates. Google Classroom is the same – when I began using Google classroom in 2014 when they first introduced it, there were some things that needed attention. It was obvious that the application was created by software engineers and coders, not by teachers. But the question mark in the bottom left of the screen allowed teachers to give feedback. The first feedback I ever offered was this:
I need my students to be sorted (or able to sort) alphabetically by last name.
That’s classroom 101 to a teacher. Not so obvious to a software developer. We don’t understand their job, they don’t understand ours. But with feedback, improvements come. Around the end of the first semester I came to work one day, and ALL MY CLASSES WERE IN ALPHABETICAL ORDER!
I didn’t have to install/update/patch anything to have this take place. When Google had the code ready to make this happen, it happened.
This process of updating software in real-time is the reality of web 2.0. Think of your smartphone – almost daily you likely have at least one app that updates itself (or depending on your settings, asks you to update it).
So, as we move to Google as our backbone, we now have software that is dynamic. It updates. It improves. Without requiring money, time or skills from us. It’s pretty awesome, to be candid.
This edition of Ed Tech Tips, Tricks & Hacks contains nuggets of wisdom on:
This edition of Ed Tech Tips, Tricks & Hacks contains nuggets of wisdom on:

Instead of looking for all those place value blocks you used last year (they’ve gotta be there…. somewhere…) why not sign out a cart of chromebooks and provide kids this link (If you have a class website or use Google Classroom this is a must-have link!) to the Number Pieces by the Math Learning Centre so that everyone can use the manipulatives, and you’re not left at the end of the day picking up all the “ones” blocks off the floor!
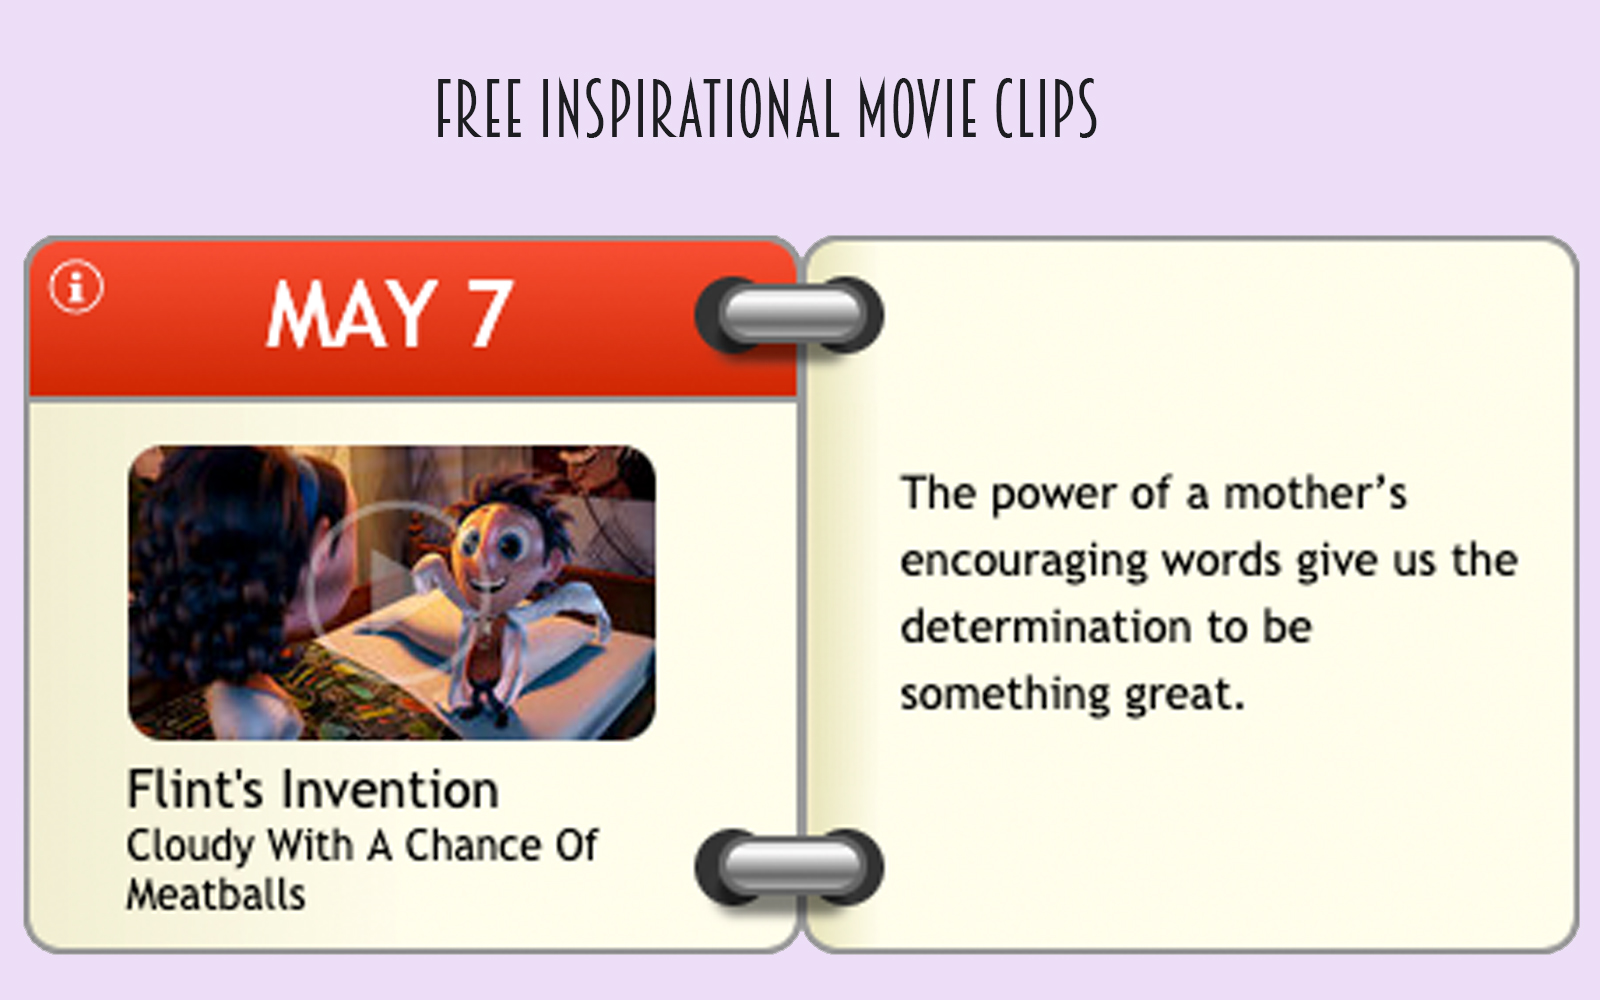
Did you know there are online resources out there that offer just the movie moments you may be looking to use in your classroom? Clips you may not have known about, clips you may have forgotten about, or other just plain good uses for movie clips. Wing Clips is one such site. Though it appears that its backbone is through a religious organization, there are still many resources to consider.
Another site is ClipShout. This site is only free for 14 days, but also contains a large library of potentially useful movie clips for teachers.
This website from a school in BC has a list of stories of people who have been involved in various situations where some different choices as it pertains to digital citizenship could have changed the course of their lives. They made choices, and they live with the consequences of those choices. If you’re needing a story to tell your class to underscore a point you’ve made or need to make, you may find what you’re seeking here.
This app is a super cool use of technology in the classroom in that you only need ONE DEVICE to engage an entire class. The teacher needs a cell phone or a tablet – that’s it.
In a nutshell (and it is so easy!)….
BEFORE CLASS…
Open an account at www.plickers.com
Print off a set of the cards at https://www.plickers.com/cards – they look like space invaders. They’re weird!!!
Enter classes and students you would use the app with.
Download the Plickers app to your phone.
Plickers will automatically assign one of those cards you printed off to each student.
Create a bank of multiple choice questions on your computer, in your plickers account.
Select the questions you wish to assess during your classes and add them to the queue for that class.
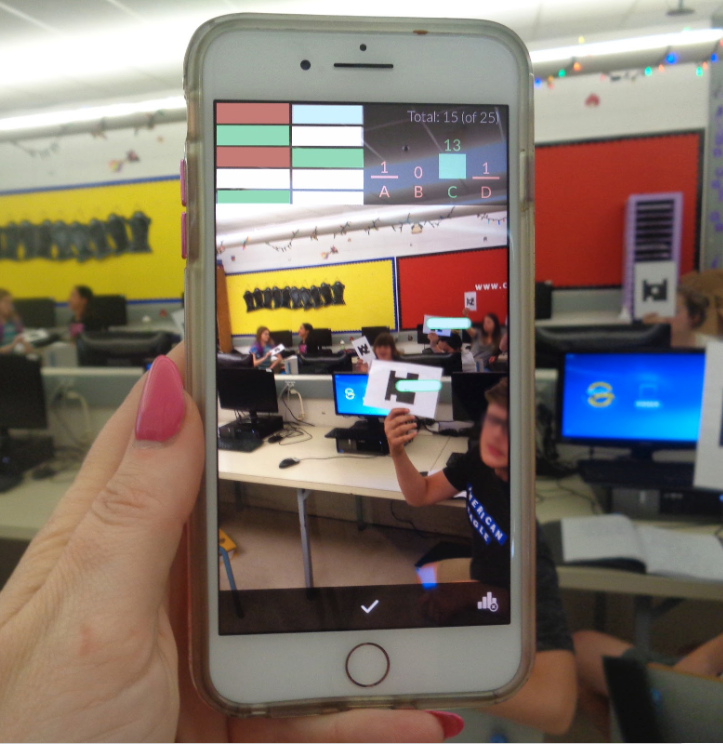
(Above photo is from my own class)
IN CLASS
Distribute the cards to the students as per Plickers’ assignment of them.
Broadcast (from your Chromebook) www.plickers.com on your TV or through your projection system and click on LIVE VIEW (this is optional, but kids LOVE it).
On your phone/tablet choose the class you are teaching during that block.
Select one of the questions from the queue that you wish to assess for student understanding.
Students will select their response from the 4 multiple choice responses and will hold their unique card up with the letter pointing UP that represents their choice to respond with.
You will hold your phone up and scan the classroom and the students’ responses will be logged.
WHY TEACHERS LOVE IT
– First of all, IT IS SO EASY TO USE.
– A red or green oval will appear above the heads of your students. Green, of course, indicates they answered correctly, red indicates their response was incorrect. This particular app keeps the teacher INVOLVED and ENGAGED with the learners. You see with your eyes in a matter of seconds who understands the content and who is struggling. It’s not just data on a screen; it’s live, it’s real-time, and it’s an actual visual of your classroom. You finish the class block with a lot of good information as to what needs to be re-taught or reviewed, and with whom.
– Because the shapes appear so random to the human eye (and the letter markings are printed so faintly) cheating is not possible unless a student shouts out their answer.
– It uses the camera of your phone/tablet with Augmented reality features to give you the visual representation of learning as you view your class. The photo was taken in Michelle Baragar’s classroom during the 2017-2018 school year.
THINGS TO NOTE:
Laminating the cards will make them last longer, of course, but depending on the positioning of windows in the classroom, the glare from the laminate can make scanning the students’ cards a wee bit more challenging.
Students can change their mind about a question. All they need to do is change the direction they are holding their card and ask you to re-scan it.
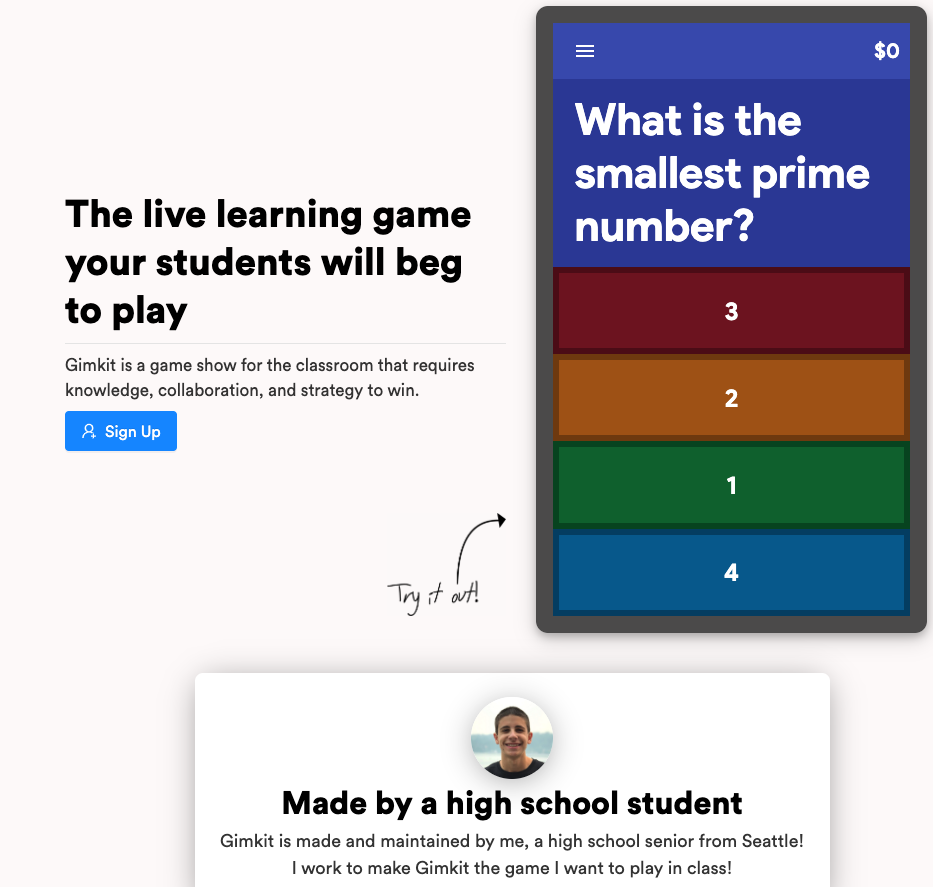
I know in my classroom last year, kids were getting pretty sick of Kahoot. They loved the engagement, but it was the go-to app that EVERY teacher used. It wasn’t novel any more. It was common. I’d love some feedback on this newcomer to the domain of “Student response systems”. It was designed by a high school student, it’s free, and it has a gamified element where their accumulated points from in-class engagement allows them to make “in-game purchases” with the points – so they have more at stake than just having their names appear on the podium at the end of the quiz. In theory, it should reduce kids answering with silly responses because of the secondary game that their overall points afford them.
Many thanks to Steve at CP Blakely for his professional review after trying it out in his classroom: “Overall, loved the experience and engagement levels for students, just wish there was a bit more on the teacher’s end of things.”
PROS:
– Students review materials at their own pace (as opposed to a whole-class game of Kahoot) – You don’t have to wait for the class to go to the next question
– You can “do something” with your points (i.e., the shopping experience), which in turn motivates students even further to answer questions correctly
– Highly engaging
CONS:
– If you don’t have an even number of students, the teams will not have the same amount of people, giving larger teams the advantage when collecting cash.
– Some students reported some lagging/auto-tapping answers.
– As a teacher, the free version of GimKit does not allow me to edit “Kits” (or games) I’ve already created. I didn’t know this before I started one, and when I went back to edit it later, I realized I couldn’t. I could have made a new one, but we’ve only got 5 games with the free version as well.
– The data in the reports is not as manipulable or user friendly as Kahoot’s is (if we’re just comparing these two platforms), which is the sweet-sauce for me in using these sorts of games.